I spent most of the day out working in the yard, so I didn't have the time to do much "documentation" on dinner, but tonight we're having a local pot roast meal, complete with a local hunka grass fed beef from Lau Family Farm, some of the local carrots I scored a while back, local potatoes and onions, and some more homemade no-knead bread. And, since I'm in charge of getting the bread into the oven, I'd better get off the computer for a bit and get that done!
I should be back to my normal recipe and pictures postings with some cool condiment and deli meat recipes later this week.

Showing posts with label dark days challenge. Show all posts
Showing posts with label dark days challenge. Show all posts
Saturday, March 22, 2008
Sunday, February 24, 2008
Dark Days Eat Local Challenge, Growing Challenge
 Well, it's been a busy week over here, so while we've been eating locally as much as possible, I haven't had the time to document anything with pictures or write out recipes.
 Some of what I've been doing is the last of the planning and seed buying for this year's garden and starting our early transplants. We're concentrating on low upkeep and on growing things that will keep well in the storage room over the winter or that will can or freeze well this year. Our plan is to go heavily on the tomatoes, beans (dry and snap), winter and summer squashes, cucumbers (pickles), and root crops like onions, shallots, garlic, turnips, beets, rutabagas and parsnips (the last two will be new for us this year.) I'm working on our garden layout right now, so I can see how much of what we want to grow will actually fit in the space we have! I will probably do some self-watering containers for the peppers and eggplants and other things we're not going to grow a huge number of. With our long cool springs, peppers and eggplants will probably do better in containers anyway because the soil warms faster. For tomatoes, we're trying some new (to us) heirloom types that were bred to be more cold tolerant. Most of the varieties I've found seem to come from Russia, which is no surprise. And many of them are "black" tomatoes - which will be interesting, as we've never really grown any before, but they sound delicious in the descriptions and luckily no one in our family will flinch at purple-brown tomato sauces! I've already mentioned the turnip rooted parsnips in another post.
Another thing that's been taking my time this past week or so has been doing research on ways we can live a bit more lightly, compost a bit more, use less plastic, and eat more locally. I bit the bullet this week and ordered some local beef and lamb for the freezer. I'm sorry, but that last humongous meat recall was just one recall too many for me (this makes what - three major recalls in the past year?) So, we're not going to be eating much (if any) factory farmed meat from now on. We were headed that direction anyway, this just gave me some incentive to step things up a bit. My husband and I both agree that we'd much rather eat far less meat and pay more for it than to eat meat that came from poor unhealthy, dying, filthy downer cows or meat raised in unsanitary, environmentally damaging (and horridly cruel) factory farm conditions. It's probably better for our health to eat less meat anyway, and certainly better for our budget if we eat less of it, even if we pay more per pound. At least we'll know where it came from and have a good idea of the conditions under which it was raised and slaughtered.
On the plastics front, I'm trying to get our lunches as plastic and waste free as possible. We already have reusable containers and bento type lunch boxes, but I needed plasticless sandwich and snack wrappers. I ordered some PEVA lined wrap-a-mats and small wax paper bags for the small stuff, and some soywax paper for larger items. I don't see how we can put as much food in the freezer as I want this summer without using plastic, but I've settled on a compromise. I'm going to buy the very best quality heavy duty plastic freezer bags I can, and then commit to washing and reusing them. For meats, we'll be able to use butcher paper or aluminum foil - but that's not as practical for green beans or corn off the cob, I think.
At any rate, I do have a couple or three items up from this past couple of weeks for the Eat Local Challenge. But in addition to that we've also had Elk Stroganoff (yes, I decided it sounded too good not to make!) and today we're having beefy (actually, elk-y) vegetable soup with dumplings. We've also had bean burritos with homemade tortillas and cheese, and lots and lots of bread and cambozola clone. Oh, and one meatless Indian curry type vegetable stirfry over rice. And I found a local grocer that stocks at least some local vegetables in the winter, so we were able to restock our waning carrot and onion stashes. So we're still eating as locally as we can, even if I've been a bit too preoccupied with other things to document it! The good thing is, with these changes I'm making, we might actually surpass my goal of 50% local eating by the end of the year. I'm really jazzed about that!
Sunday, February 17, 2008
Cambozola: Day 23 - First Taste - Dark Days Challenge
When I went to the storeroom yesterday to check on the cheeses, I noticed the Cambozola clone seemed to be pretty well ripened and was giving off a really delicious cheesy smell.

So we decided to try it, even though it really probably needed another couple of weeks to age. Here's what it looked like cut open.

The taste - how to describe it? It's a very interesting mixture of creamy and sharp. It's very close to Cambozola in taste, although as you can see, there is no blue mold in sight. We think the lack of air holes kept the blue mold from growing to maturity within the cheese, although it doesn't seem to have kept it from growing enough to provide some flavor. The outer edge is creamy and runny like Camembert, the inner is creamy and a little sharpish like a good dolce Gorgonzola. It was wonderful on hot bread fresh from the oven, and consensus is that even if it's not exactly a Cambozola clone, it's pretty darned good!
Friday, February 15, 2008
Happy Local Valentine's Day - Dark Days/Growing Challenge
 It was a typical busy mid-week evening here, so I didn't have time to do a whole recipe blog entry, but here's what we had for Valentine's Day.
 Clockwise from high noon: Salad (yes, from the salad table!!!!!!) with marinaded mozzarella balls (homemade from local milk) and sundried tomatoes from last year's garden, rosemary olive oil bread from local wheat (No Knead recipe, homemade), local trout fillet with a creamy tarragon sauce (dried tarragon from our garden, cream from local dairy, shallots from last year) and local wild rice pilaf. And since my first bottled wines still need at least another couple of months of aging before they can be drunk, we enjoyed a bottle of a light sweet red from an Idaho winery.
The salad table looks pretty pitiful after being shorn, but I'm hoping it will perk back up quickly and we will have enough for another salad soon. Unfortunately, I found aphids while I was harvesting. It's one of the banes of indoor gardening in the winter - especially when you have a room filled with plants that go in and out with the season. But I'm using some organic sprays and hopefully not having so much to eat for a while will cut way back on their numbers as well.
Saturday, February 9, 2008
Recipe: Moroccan Lemon Lentil Soup - Dark Days Challenge
MOROCCAN LEMON LENTIL SOUP WITH RICE
Serves 3-4
1 cup dried lentils
1/2 cup wild or brown rice
1-6 cloves of garlic (I used 6!)
2-4 pieces of Moroccan Preserved Lemon, seeds removed
Salt to taste
1/2 cup of yogurt or sour cream
This makes a very simple, meatless meal. It looks kind of funny, but it tastes really good. At least, we thought it did. For a full meal, add some fresh bread and a salad and you're good to go.
I get to cheat on this recipe a bit - the lemons in this recipe are home-grown! I have a potted Meyer lemon tree that lives in my greenroom half the year and outside in the garden during the other half.*** Last year I got quite a few lovely little fragrant and thin-skinned lemons and - not wanting to waste one precious bite (not even the peels) I decided to make Moroccan Preserved Lemons (click to view the recipe I used.) Here's what they look like.

If you don't have preserved lemons, you could probably just add a bit of fresh lemon pulp and some grated lemon peel. It won't be the same, but it should still be good. In the meantime, if you have access to any Meyer Lemons (or another thin-skinned variety) then click on the recipe link above and get some started for next time! They really are wonderful. I sometimes make a very simple vegetable stir fry with rice dish and just one of these preserved lemon sections diced finely really peps up the flavor all by itself.
So, back to the recipe. Start the wild rice first, because it takes the longest to cook. Cook it according to the directions on the package. Make sure it is fully cooked and tender, because it won't be cooked any more. Cook the lentils, lemon pieces and garlic cloves in enough water to keep them covered. Stir often to prevent sticking. When the lentils are tender, get out your hand blender (or cool them a bit and use the regular one) and puree until nice and smooth. Drain the wild rice, and add to the pureed lentils and lemons. Add the yogurt or sour cream, stir to blend and add salt to taste. Garnish each bowl with a dollop of extra yogurt or sour cream if you wish, and chopped chives or parsley.

----------------------
*** I also have a lime tree, a pomegranate tree, a fig tree, three banana trees, a pot of lemongrass and a pot of galanga root. And fifty saffron crocuses, some of which bloomed this year. And a rosemary shrub. And a big pot of lemon thyme, which isn't hardy here. And a bay laurel tree. And an olive tree. And a tea plant. And a tea jasmine bush. I still want a condo mango and a kumquat. And a Key Lime or a Limequat.
I need a bigger greenroom. And more self-control, I'm afraid.
Recipe: Idaho Trout Caviar and Potato Blinis - Dark Days Challenge

This weekend, for my Dark Days Challenge, I made homemade Trout Caviar on Idaho Potato Blinis with Sour Cream. I had no idea a couple of weeks ago that I'd be making caviar, but the opportunity presented itself, and it seemed an interesting project. Here's the story behind my venture into the fru-fru side of local food...
While researching some ideas for preparing home-smoked trout from the fillets we were planning to buy, I came across some obscure references to "Trout Caviar." Doing a bit more research, I learned that there are commercial Trout Caviar suppliers in the U.S., but that most Trout Caviar currently comes from one particular farm in North Carolina. I learned that there had been a large corporation with some interest at one point in farming caviar-producing fish here in Idaho, but apparently that had fallen through. It looked like I was sitting right in the middle of the largest trout farming area in the country with nary a golden bite of trout caviar in sight!
Then, on a whim, I contacted the lady at the trout farm who had been so helpful with info on the fillets I'd ordered, and asked her if they ever sold fresh unprocessed fresh trout roe? They did. I ordered three pounds of the stuff to play with, and started hunting down articles on how to process it into Trout Caviar. Although the references I found were few and far between, by piecing together about a half dozen or so - many no more than just a sentence or two - I managed to figure out the basics of the process. I also found some ideas for flavorings and accompaniments, and even found some very interesting nutritional stats on it. As it turns out, the stuff is actually quite good for you - it's apparently packed with vitamins, protein and Omega 3 fatty acids. I think if it wasn't so prohibitively expensive to purchase it ready made, it would probably be touted as a health food of sorts. Making caviar at home, however, if you have access to fresh roe, can be quite economical. I got three pounds of unprocessed roe for less than five dollars from the trout farm.
Trout Caviar is very, very mild with a sweet buttery flavor. If you are worried that you won't like it because it tastes "fishy" then you will probably be pleasantly surprised. To be honest, this caviar doesn't even smell fishy.
BASIC TROUT CAVIAR
Trout roe - use only very fresh, very clean trout roe that's been kept very cold
Kosher or sea salt to taste
pinch of sugar
ice cold brine for soaking the roe skeins
First, soak the unprocessed roe skeins in a bowl of ice brine water. I used about a tablespoon of salt for a gallon of ice water. You want to wash as much of the raw juices out of the roe as possible before trying to get the eggs free. Treat the roe very, very gently so as few eggs as possible get broken.
After the roe has soaked for a few minutes, rinse under gently running water and let it drip a bit. Now you are ready to begin removing the eggs from the fibrous membranes. It took me a few minutes to get the hang of this. There is definitely a technique to getting the plump little eggs out of the roe "skeins" with minimal breakage and minimal skein fibers to have to pick out of the end result. In the end, this is the setup that worked best for me - a plastic rice paddle and a small cutting board. In this picture you can also see what a whole, unprocessed roe sack looks like.

The trick to getting the most eggs out whole is to think "push" not "chop." You want to hold one end of the roe sack and use your spatula or spoon to PUSH the eggs out of the membrane in stages. You will pop a few, but most should come out whole. As you work, occasionally scrape the accumulating pile of released eggs into a cup of ice cold salt water. When you have as many cleaned eggs as you need, begin rinsing them and pouring off the broken egg shells and other debris. The water will be cloudy at first from the broken eggs, but will clear after a few rinsings. Drain the eggs well and place them into a plastic container. Add salt, a pinch of sugar, or any other seasonings you like, and gently mix them in. Put the lid on it, and put it into the fridge for at least a few hours to cure and mellow out. All done!

According to the resources I dug up, fresh roe can be frozen in small batches for cleaning and curing later. That's what I did with much of mine. I only cleaned a few ounces for this meal. The rest was frozen in four ounce tupperware type containers.
MINI IDAHO POTATO BLINIS
Makes about 2 dozen "silver dollar" size blinis
1 medium to large potato, boiled or baked until tender but still firm, cooled
2 large eggs
1/2 tsp salt
1/4 tsp freshly ground pepper
1 tsp dried or 1 tbsp fresh chopped parsley
1/4 tsp red pepper flakes
1/3 cup milk or half and half
1/3 cup flour
butter or olive oil for pan-frying
freshly chopped shallot greens or chives for garnish
To make the blinis, first, either coarsely mash or "rice" your cooked and cooled potato. You should have about a cup of potato when you are through. Add the two large eggs, the salt, pepper, parsley and red pepper flakes, and mix thoroughly. Add the flour and milk, and mix again.

Drop by rounded tablespoonfuls into a hot pan that's been oiled with butter or olive oil. Fry until lightly brown on the bottom, then flip and fry until cooked through. You should end up with about 24 mini blinis. Set the cooked blinis aside on a napkin to drain and cool until you have all the blinis cooked.
If you are doing a fix-your-own blini buffet, place the still slightly warm or room temperature blinis on a platter, along with a dish of sour cream and at least one flavor of cold Trout Caviar. I have two flavors here - plain and "smoked." The smoked is actually plain caviar that has one drop of smoke flavoring stirred into it.

To serve, place a teaspoon of sour cream on each blini. Top with a small spoonful of Trout Caviar, and sprinkle with freshly chopped shallot greens or chives, then a tiny bit of red pepper flakes. Pass additional kosher or sea salt if needed.

Thursday, February 7, 2008
Cambozola: Day 13 - Piercing and Wrapping - Dark Days Challenge
 Well, as you can see, the fuzz on the (hopefully) Cambozola cheese clone has totally taken over the outside of the cheeses and is covering them to a depth of about 1/8 inch or so.
 This means it's time to wrap the little boogers in cheese wrap and then wait with baited breath for another couple of weeks to see how they turned out. But, because I just can't ever seem to leave well enough alone, I tried an experiment. The blue cheese recipes I've read generally tell you to pierce the cheese all over with a thick needle or ice pick to let the bleu mold "breathe" before it goes into aging mode. So I pierced one Cambozola clone cheese, and left the other unpierced. If the piercing is successful in helping the blue mold grow, then I should begin to see blue mold poking out of the holes I made in the side of the little cheese wheel in a week or so.

The good thing about piercing the one cheese is some of the inside oozed out over the needle while I was working. That means I got to try a tiny taste of what is going on with the cheese under all that fuzz - and it was already really creamy and tasty! So I can hardly wait to see how this all turns out. I wonder if making the cheeses small like this hastens their ripening - the larger surface area for the mold compared to the inside area may be having that effect. If so, I may actually be able to try these in about one month or so from start to finish, vs the two months suggested for ripening a larger size.
I'm going to start another batch of Cambozola clone this weekend, plus another cheddar or a gouda. This cheesemaking could get to be addictive!
Sunday, February 3, 2008
Recipe: SasSquash Curry - Dark Days Challenge
Don't ask me what I was thinking when I bought this monster last October.

It was a lovely fall day. I was running around one of the the last Farmer's Markets of the year with my little hand-truck piled high with boxes of Idaho Russett potatoes, pumpkins, and squash of all types. All the normal-size squash I bought that day have already been used up. Not this one. After I lugged it home, I realized - too late - that because I'd bought the silly thing, that meant I'd someday have to cut it up and cook it. I've been avoiding looking it in the eye ever since.
But earlier this week I decided that I was tired of seeing it squatting like a gargoyle on a shelf in the storage room, sticking nearly a foot out into the walkway, mocking me for my impulsive purchase every time I walked in. I noticed the skin was starting to mottle, which told me the behemoth was beginning to age a bit. I still didn't really want to mess with a ton of squash, but I also didn't want to waste it. So I figured it was probably time this weekend to buckle down and finally deal with the SasSquash.
Off to the Internet I went, searching for and bookmarking winter squash recipes as I found them, and trying to decide just how I was going to use some of this for a meatless Dark Days Challenge meal this week. We love Indian food, so a squash curry recipe sounded promising. But then there was that lovely lentil dish... And I still had a pint and a half of homemade sour cream sitting in the fridge. And a monster white carrot left over from this fall that we found in the garden while we were outside earlier in the day...
By the way, this picture has absolutely nothing to do with this recipe, except that my usual "kitchen crew" was hanging around at my feet the entire time I was cooking, begging for squash chunks. So I snapped a picture of them while they were on break.

This recipe is an amalgamation of several that caught my eye with a few extra touches thrown in for good measure. It actually turned out quite well - the tastes are very complex and unexpected. It's also pretty nutritious, with the rice and lentils forming a complete protein, plus the squash, onions and carrot for vitamins and minerals, and the sour cream for calcium and creamy dairy goodness. The sour cream also helps cut the spice a bit, mellowing the dish out. If I'd had some spinach ready, I would have tossed that in as well at the last minute for even more flavor and nutrition. Maybe next time - I definitely plan to make more of this. My family wants me to make more TODAY. Since I have plenty of ingredients left, I will probably do just that. Because that's how you eat a SasSquash - one meal at a time.
SAS-SQUASH CURRY WITH LENTILS AND WILD RICE
Serves 4-5
4 cups cooked, cubed winter squash
1 cup dry lentils
1 cup wild rice
1 large or two small carrots
1 large or two small onions
2 Tbsp butter or olive oil
Curry Powder or Indian vegetable masala powder, whatever you prefer
Mild or hot red pepper flakes
Sour cream or yogurt
Chopped chives, green onions, or shallot tops for garnish
Salt to taste
Dealing with SasSquash: Cut whatever winter squash you are using into largish chunks, and scoop out the seeds. Don't worry about taking out all the seed cavity fibers - you can remove those after it's baked and it's a lot easier to do it then.

Place the chunks into a baking pan, add an inch of water, and bake at 350 degrees until the squash is tender enough to stick a knife into, but still firm enough to cut into solid chunks. Just keep poking a knife into the skin side now and then until it goes in without too much effort. Remove the pan from the oven and let the squash cool enough to handle without burning yourself. Peel the skin from each piece, remove the inner strings, and cut the squash meat into 3/4 inch cubes. Set aside four cups for this recipe, and if you have a very large squash, put the rest of the meat into freezer containers for other meals. We'll come back to it - I promise. We have to. I now have nine bags of leftover squash sitting in my freezer.

Here are the main ingredients: clockwise from high noon - bowl full of SasSquash chunks, Idaho grown organic wild rice, onions, a large carrot (yes, I know it looks a lot like a daikon radish, but it's really a leftover white carrot from the Rainbow Carrot seed pack we planted last year) and a jar of dried green lentils from our storage room.

While you are finishing up with the squash, start the 1 cup of wild rice in a saucepan on the stove, following the directions on the package. Make sure the rice is fully cooked as it won't be cooked again later. This should take about 45 minutes. Rinse the lentils, and place them in another saucepan with water to cover and simmer for about 30-45 minutes. You want the lentils to be tender, but still firm enough to be slightly chewy. Keep them covered with water until they reach that point - they don't take long to cook because they are so thin. When they are fully cooked, remove them from the stove and rinse them in cool water, draining the excess, and set them aside in a bowl for later.
While the lentils and rice are simmering, cut the carrot(s) and onion(s) up into bite-size chunks. Sautee these in melted butter until the onion begins to become transluscent. Add about a cup of water, and simmer until the carrot starts to soften, about 10 minutes. Add more water if necessary, but only a little bit at a time. You want enough water to cook the carrot to tenderness, but not so much that it turns into a soup. When the carrot is crispy tender, add your seasoning to taste, then add the squash and gently simmer until all vegetables are fork tender but still firm enough to hold shape. Allow the water to cook away towards the end so you have a very chunky, thick mass of vegetables in the pan. Taste and adjust seasonings, and turn the fire off. Ok, we're almost finished!

To serve: place about 3/4 cup of wild rice in the bottom of a bowl or on a plate. Spoon about half a cup of the cooked lentils on top of that. Mound about a cup of the squash mix on top of the rice and legumes, then spoon a couple of tablespoons of sour cream or yogurt on top of the squash, letting it melt and trickle a bit down the sides of the squash mound. Sprinkle everything with chopped onion greens, then the dried red pepper flakes. Serve immediately, with more sour cream if anyone wants it to cut the spicyness a bit more. Wimps.

Totally local, and meatless (or vegan, if you used olive oil and forgo the dairy on top) as well. And very, very tasty!
Saturday, February 2, 2008
Cambozola: Day 7 - We have fuzz!!! - Dark Days Challenge
 When I opened up the cheese aging box this morning to check on the progress of the Cambozola I started last weekend, I caught a lovely whiff of "mushroom" - and if you look closely, within the red circle, along the edge of the cheese, you can see the beginnings of penicillin candidum fuzz! Looks like even if the "-ozola" part doesn't work out, the "camb" part should be fine. That's a relief, because it means I've probably managed, through sheer dumb beginner's luck, to avoid the worst of the mistakes I could have made with this cheese to this point. As long as I keep it in the proper temp and humidity range, I should end up with something at least edible - whether it's gonna be the Cambozola clone I was aiming for remains to be seen...
While we're on the subject of "fancy shmancy food" - I have something in the works for the Dark Days Challenge that may turn out to be very, very cool. It's still in the planning and research stages, but at this point I think I've learned enough and located all the raw local materials I need to succeed. However, there's always the chance the project will still fall through for some reason outside of my control, so I'll keep mum on what it is for now. But if it doesn't fall through, look for news on something very unexpected on the local Idaho foods front next weekend!
Monday, January 28, 2008
Cambozola: Day 2
 How to make cambozola is apparently a bit of a trade secret, so while I did a fair bit of online research on the steps, all I was able to find were other home cheesemakers like myself trying to figure it out! So it will be interesting to see if this works or not. Even if it doesn't, I should still end up with an interesting cheese. (Btw, the dark stuff on the insides of my "high-tech empty #2.5 can cheese molds" is not rust, it's condensation and whey droplets.)
The curds basically have to drain for a couple of days under their own weight. This is Day 2 - I packed the curds into the molds yesterday (they were all the way to the top of the molds to start with) and they have been draining whey ever since. Way much more whey than I would have thought that little bit of curds could hold! Seems like cups and cups. Anyway, the curds have shrunken down to about 1/3 of their original height, and it is all starting to hold together when I turn the "mold sandwiches" every few hours. Later tonight, I'll test them to see if they are solid enough to go without being in the molds, and start gently sprinkling salt on the outside. Then I'll put everything into the "portable cheese cave" I've made from a clear plastic shoebox and a plastic shelf, schlep it down to the 45 degree storage room, and wait the next several days to make sure it starts growing the white fuzz it's supposed to grow. Crossing my fingers!
Saturday, January 26, 2008
Recipe: Chicken Udon Soup - Dark Days Challenge
 CHICKEN UDON SOUP
Serves 6-8
Soup Base:
1 large stewing chicken
1 Tbsp fresh minced ginger root, or equivalent dried
salt to taste
chopped green onion for garnish
Water to cover
Noodles:
4 cups flour
1 Tbsp. salt
2 eggs
Water
I was a bit rushed today, so I didn't get a picture of all the ingredients before I started. I wish that I had - the chicken we used was HUMONGOUS. It was an eight pound plus stewing chicken we bought from a local farmer a while back. Very tasty, it was, and there is plenty of meat for at least a couple more meals! Everything but the ginger root was local. This is a very simple soup with few ingredients. The only time intensive part is making the noodles, and that really doesn't take very long.
The first step is to rinse the chicken off and put it into a kettle large enough to have enough room to cover the chicken with water. Boil the chicken gently until the meat comes easily from the bones. Remove the chicken from the pot and cool it enough to separate the meat out. Set the meat aside for now. Bring the stock back to a simmer, and add the ginger. Let the stock sit on a very low simmer until the noodles are finished.
To make the noodles...stir the salt into the flour in a medium size bowl. Add eggs, and about a half cup of water. (You can add more later, how much you will need depends on the type of flour, the humidity and the size of egg you use.) Mix the dough well, adding just enough water to make a stiff, but still kneadable dough. Knead the dough until it is smooth, and let it sit for at least 15 minutes to relax. This makes it easier to roll out.
Divide the dough into three parts, and roll each portion out to approximately 1/8 inch thick. Dust the dough with a bit more flour, fold it over into thirds, and cut the folded roll into 1/4" or less ribbons with a sharp knife. Shake each noodle out gently and pile the finished noodles to the side until all are cut. These udon are made from whole white wheat, so they probably aren't the color one would expect. The flavor, however, was outstanding.

In the meantime, bring a saucepan of water to a rolling boil, and add a teaspoon of salt. Drop the finished udon noodles into the hot water a handful at a time. Stir them so they don't stick together, and cook them for one minute after they rise to the surface of the water. Scoop the noodles out of the hot water, rinse them lightly with cool water, and place them into a bowl. You want to partially cook the noodles separately first so the starch that comes off them in the first few minutes doesn't end up in your soup stock, making it unattractively cloudy and gooey.

When all noodles have been pre-cooked, bring the chicken stock up to a rolling boil, and slide the noodles into it. Cook noodles until chewy, but tender and cooked all the way through. How long it will take depends on how thick you made them, but it shouldn't take more than 3-5 minutes or so.

Into each soup bowl put some of the reserved chicken meat cut into bite size pieces, a nice large serving spoonful of the noodles from the broth, and some diced green onion. (These are the first of our shallots from the salad table!)

Ladle the hot ginger-flavored broth over all, and serve! Here is the finished dish - my noodles are a bit thicker and larger than is "traditional" but that's how we like them. You can make yours thinner and smaller if you like.

What's going on in the kitchen this weekend?
 Homebrewing: I have two fruit wines and a simple sweet mead that need to be bottled. I have another bottle of concord grape wine in the storage room that may also be ready to bottle, but if I can get the three I have upstairs racked and into the little single serving size bottles I bought, then I'll be doing well! (Update: the plum wine apparently isn't ready to bottle yet, once I brought it up into the warmer house, it began to bubble again! So, I guess that one will wait for another couple or three weeks. The mead and raspberry wines are bottled, though, and I even "prettied up" a few bottles for a picture!)
 Salad Table: I will have transplanted nearly all the salad starts by the end of this weekend. They are actually doing pretty well! The lettuce is about three inches or more tall. The shallots are sprouting like mad and should be ready to start cutting by next week some time. With luck, the lettuce will be ready for a first light picking in a couple of weeks. Maybe I can serve my sweetie a home grown salad for Valentine's Day. Keeping my fingers crossed...
Cheesemaking: I decided to go for broke and make a batch of Cambozola. It's a Gorgonzola/Camembert hybrid that we just love melted on fresh, hot bread. Since we have fresh hot bread nearly every day now, I figured I'd give that a try. It's also a cheese we can rarely find here in the grocery stores, and when we can find it, it's generally 12-14 dollars a pound. So economically, it's a very good candidate for home cheesemaking. If it works, I should be able to make a little over a pound of it for just a bit more than the cost of a gallon of milk.
 Dark Days Challenge: I am still trying to settle on my DDC meal to document for this week. I'm leaning towards oriental food (something we eat a lot of and love) but I can't decide between chicken or pork based dishes. We have both local pork and chicken in the freezer right now, so I could do either. My sweetie is nursing a cold this weekend, though - so I think chicken would be a good idea. I can make him bunches of chicken soup (the roasting chicken we got from a local source here is about an 8 pounder, dressed, so there's plenty for several meals on that one!) and still have lots of meat left to make other dishes.
 At any rate, I'll have pictures for all of this up at intervals over the weekend. I have some step by step on the Chicken Udon Soup I made tonight, but it's been a long day with the mead and wine bottling and nursing a sick husband, so it may have to wait till tomorrow!
Sunday, January 20, 2008
Recipe: Idaho Onion Soup - Dark Days Challenge
HEARTY IDAHO ONION SOUP (with ELK)
serves 4 - 5
2 lbs. elk (or buffalo, or beef) "osso bucco" (shank or leg steak)
2 large or 3-4 medium or small onions
1 large or two small carrots, chopped into largish chunks
1 cup diced celery, or 1/2 tsp celery seed, or 1/4 cup dried celery
1-6 cloves garlic (I used 6, we like garlic)
1-2 bay leaves
fresh herb sprigs - thyme, rosemary, etc.
6-8 whole peppercorns, optional
1 small bottle of beer, optional, your choice of style (here I'm using some wheat beer I made this fall)
1 Tbsp meat drippings, saved from the roasted meat, or 1 Tbsp olive oil to be used for sauteeing onions
salt to taste
This is a type of not-quite-classic French onion soup. Definitely winter comfort food! The flavor of homemade beef (or in this case, elk) stock is nothing like canned stock or that made from instant bullion. It has a complexity and depth of flavor that only slow roasting and slow cooking with aromatic vegetables and herbs can give. Because there is a fair bit of meat on the bones this makes a nice, light one pot meal with the addition of some bread and a salad. This recipe also finishes just as well in the crockpot, for those of us who have to be away all day and can't mind the stove.
Ingredients round up: Clockwise from high noon (okay, "high eleven-thirty"...) we have a bowl with some no-knead bread dough patiently doing its thing, a small bottle of home-made beer, three onions (storage sprouts and all), osso bucco elk leg shank steaks waiting to go into the oven, and one 2 lb. wheel of our inaugural farmhouse white cheddar cheese, ready to be opened and (hopefully) melted on top of the finished bread we'll be eating with the soup. I forgot to set out the herbs, spices and carrots for this picture, but they made it in later!

Roast the osso bucco in the oven at 400 degrees until nice and brown. If the meat looks like it might burn or become too dry before the bones are roasted, haul the whole thing out of the oven and cut the meat from the bones. Hold the meat aside until you assemble the stock, but roast the bones a bit more. The darker you can get the bones at this point (without burning them, of course) the richer the flavor and color of the stock will be when you are through. If you like the taste of roasted garlic and carrots and want to boost the flavor of the stock even more, throw them into the pan with the meat about thirty minutes before you take the pan out of the oven. Be sure to watch so the veggies roast but don't burn. Burnt garlic, in particular, tastes rather nasty.
If you want to use the crockpot method and don't have time to do all of this in the morning before you leave, try making the recipe up to this point the night before, then cool and refrigerate everything. The roasted meat and bones (and vegetables, if you decide to roast them first) should look something like this when you are finished.

Round up the rest of your stock ingredients, and set out the crockpot or stock pot you plan to cook everything in. Remove the meat from the roasting pan (reserving any drippings if you want to sautee the onions in them.) Place the roasted meat and bones into your crockpot or stock pot, adding enough water to cover all by a good couple of inches. Add the chopped carrot, garlic, celery or celery seed, the peppercorns and the herbs. Slice up the onions now into thin rings, throwing the clean skins and peels into the stock for flavor. Pour in the beer (I used it to deglaze the roasting pan first.) Put a lid on the crock pot or stock pot and let the whole thing simmer on a back burner for at least a good 6-8 hours or in the crockpot for 8-10 hours. If cooking on top of the stove, be sure to keep an eye on the liquid levels so you don't run dry.

(Don't wander off for an hour to read your favorite food blogs, and forget to plug your crockpot in, like I did. Oh, well, at least it's a long weekend! And, as I told myself when I discovered the problem, it could have been worse - I could have decided to take a nap.)
In a medium skillet, add the reserved fat drippings or the 1 Tbsp of olive oil, and sautee the onion rings until they are transluscent and lightly caramelized. (If you don't have enough meat drippings to make a good tablespoonful, add some olive oil to the pan.) At this point you can put the finished, cooled onions into a covered dish and refrigerate them until the stock is ready.

With the bulk of the work out of the way, you can now take some time to work on your bread. You want to time your recipe so that it comes out of the oven about half an hour before the stock is finished. Ideally, your bread should be well baked and "settled," but still fresh and warm when the time comes to assemble the meal. If you will be out of the house, but have a bread machine, you could start your favorite bread recipe in it now and set the timer so that it begins to bake right after you arrive home (for safety reasons, you probably don't want it to go through the bake cycle with no one there.)
Here's a picture of the finished loaf from that bowl of bread dough goo in the first picture. I've got to tell you, that no-knead bread recipe is amazing. It's quite simply become the backbone of our meal menu these days. It could hardly be any easier than it is. Mix three dry ingredients with enough water to make a wet dough, let sit for 12 hours or more, half-heartedly shape the loaf, let it rise again, and bake. If you spend more than 10 minutes, hands on, actually making the bread, you're probably doing it wrong. I've had the goal of baking all our own bread for years, but with the usual recipes I could never manage it often enough to keep up with the demand for fresh bread around here. With this recipe, finally, I can. And as you can see, the technique produces the most amazing crust...my husband goes into raptures every time a loaf comes out of the oven, and he's got pretty high standards for bread.

To serve, strain the meat stock, reserving the meat chunks and if you wish, the carrots (and, of course, the stock!) for the table. The garlic will most likely have been liquified by the roasting and long cooking, so if you can no longer find it, that's where it went! Dice the meat and any retained vegetables into manageable sizes (I like approximately 1/2" dices) and put them back into the pot. Remove the sauteed onions from the refrigerator and gently stir them into the very hot broth. You want the onions to remain as intact as possible, so don't stir too vigorously. Taste and adjust for seasoning - it will probably need some salt.
Slice your bread and sprinkle your choice of grated cheese on top (or use thin slices to cover each piece) then run the breads briefly through the toaster oven or under the broiler until the cheese has melted and begins to turn golden brown around the edges. Ladle the hot broth and vegetables into soup bowls and either float a slice of the cheese bread on the top to sop up juices until it becomes "spoonable," or serve the bread dry on the side for dipping.

Sunday, January 13, 2008
Recipe: Huckleberry Pots de Creme - Dark Days Challenge
HUCKLEBERRY AND VANILLA BEAN POTS DE CREME
serves 4 - 5
4 egg yolks (use 5 if any of the eggs are small)
3/4 cup whipping cream or heavy cream
3/4 cup half-and-half (make your own if necessary)
1/4 cup sugar (white or turbinado)
1/2 of a 5-6" vanilla bean, split
pinch of salt
6 Tbsp. sweetened Huckleberry jam, preserves or puree
4 - 5 four ounce ceramic ramekins or other oven safe small bowls or cups
Preheat your oven to 350 degrees.
You will also need small squares of aluminum foil to cover the tops of the ramekins, a deep oven safe casserole or other pot that all the ramekins can fit into, a four cup bowl or oversized pyrex measuring cup, and a one cup microwave safe bowl or cup. Oh, and a wire whisk or an electric hand blender with a whisking attachment.
Here are the ingredients: clockwise from high noon we have whole milk, farm-fresh eggs, Huckleberry puree, heavy whipping cream, white sugar, vanilla beans, as well as four small ceramic ramekins and a larger ceramic casserole. All of the ingredients except for the vanilla beans are local. Well, the huckleberries came from Northern Idaho, but we picked them ourselves while on summer vacation, so I think that counts!

Split the vanilla bean lengthwise, and use the edge of your knife to scrape out all the tiny, glistening black vanilla specks. Put your half-and-half into a one cup microwave oven safe cup, add the sugar, the pinch of salt, and stir the vanilla specks into it. Heat the half and half in a pyrex measuring cup in the microwave on high for about one minute, or until steamy hot but not boiling over. You can also use a small pot on the stove, but be sure to watch it and stir it constantly.

In your 1 quart bowl or oversized pyrex cup, beat the egg yolks until they are thick. Pour the hot half-and-half slowly into the egg yolks, beating them as you go with a whisk. Whisk in the rest of the heavy cream. Note: if you use a hand blender, beat the mixture on low to medium, not on high, or you may end up with egg yolk spattered on everything in sight.
(Not that I would know, of course. Because you do NOT see egg yolk spatters on everything in sight in the background of this picture. It is just your imagination.)

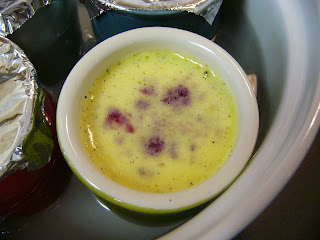
Pour the still-warm mixture into four or five 4 oz. ramekins, trying to avoid pouring in any of the foam from the whisking process. This is where mixing the custard in a large Pyrex cup comes in handy - the spout helps keep the foam back while you pour. If you have to, you can skim the foam off with a spoon, however.


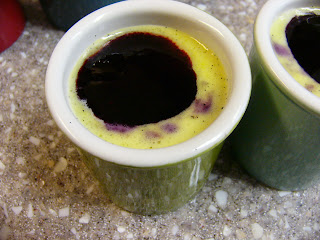
Here is the fun part - drizzle one teaspoon of Huckleberry puree into each cup of custard. Yum, yum, looks good already, doesn't it? Yes, there will be some Huckleberry puree left. No, you may not eat it. Save it for spooning over the tops of the finished custards. Yes, I know I'm a meanie, but you'll thank me later.


Cover each pot de creme with a small square of aluminum foil. Put the smaller pots into your larger pot and fill the larger pot with enough hot water that it comes about halfway up the sides of the ramekins. Now, put the whole thing into your oven for about 30 minutes.


The pots de creme are done when the edges are set but the middle still wiggles. Remove them from the oven, and let them cool enough to handle. Take them out of the larger pot, and allow them to sit on the counter, covered until they are near room temperature. Put them, still covered, into the fridge for 4-6 hours or overnight. That's it!
Serve cold with another dollop of Huckleberry puree. You can also double your caloric trouble if you like by whipping up a bit of the leftover heavy cream and dotting each pot with that as well.
serves 4 - 5
4 egg yolks (use 5 if any of the eggs are small)
3/4 cup whipping cream or heavy cream
3/4 cup half-and-half (make your own if necessary)
1/4 cup sugar (white or turbinado)
1/2 of a 5-6" vanilla bean, split
pinch of salt
6 Tbsp. sweetened Huckleberry jam, preserves or puree
4 - 5 four ounce ceramic ramekins or other oven safe small bowls or cups
Preheat your oven to 350 degrees.
You will also need small squares of aluminum foil to cover the tops of the ramekins, a deep oven safe casserole or other pot that all the ramekins can fit into, a four cup bowl or oversized pyrex measuring cup, and a one cup microwave safe bowl or cup. Oh, and a wire whisk or an electric hand blender with a whisking attachment.
Here are the ingredients: clockwise from high noon we have whole milk, farm-fresh eggs, Huckleberry puree, heavy whipping cream, white sugar, vanilla beans, as well as four small ceramic ramekins and a larger ceramic casserole. All of the ingredients except for the vanilla beans are local. Well, the huckleberries came from Northern Idaho, but we picked them ourselves while on summer vacation, so I think that counts!

Split the vanilla bean lengthwise, and use the edge of your knife to scrape out all the tiny, glistening black vanilla specks. Put your half-and-half into a one cup microwave oven safe cup, add the sugar, the pinch of salt, and stir the vanilla specks into it. Heat the half and half in a pyrex measuring cup in the microwave on high for about one minute, or until steamy hot but not boiling over. You can also use a small pot on the stove, but be sure to watch it and stir it constantly.

In your 1 quart bowl or oversized pyrex cup, beat the egg yolks until they are thick. Pour the hot half-and-half slowly into the egg yolks, beating them as you go with a whisk. Whisk in the rest of the heavy cream. Note: if you use a hand blender, beat the mixture on low to medium, not on high, or you may end up with egg yolk spattered on everything in sight.
(Not that I would know, of course. Because you do NOT see egg yolk spatters on everything in sight in the background of this picture. It is just your imagination.)

Pour the still-warm mixture into four or five 4 oz. ramekins, trying to avoid pouring in any of the foam from the whisking process. This is where mixing the custard in a large Pyrex cup comes in handy - the spout helps keep the foam back while you pour. If you have to, you can skim the foam off with a spoon, however.


Here is the fun part - drizzle one teaspoon of Huckleberry puree into each cup of custard. Yum, yum, looks good already, doesn't it? Yes, there will be some Huckleberry puree left. No, you may not eat it. Save it for spooning over the tops of the finished custards. Yes, I know I'm a meanie, but you'll thank me later.


Cover each pot de creme with a small square of aluminum foil. Put the smaller pots into your larger pot and fill the larger pot with enough hot water that it comes about halfway up the sides of the ramekins. Now, put the whole thing into your oven for about 30 minutes.


The pots de creme are done when the edges are set but the middle still wiggles. Remove them from the oven, and let them cool enough to handle. Take them out of the larger pot, and allow them to sit on the counter, covered until they are near room temperature. Put them, still covered, into the fridge for 4-6 hours or overnight. That's it!

Serve cold with another dollop of Huckleberry puree. You can also double your caloric trouble if you like by whipping up a bit of the leftover heavy cream and dotting each pot with that as well.

Thursday, January 10, 2008
Recipe: Baked Beans and Elk Short Ribs - Dark Days Challenge
Finally, here is a full recipe, pictures and all!
BAKED NAVY BEANS WITH ELK SHORT RIBS
Serves 4-5.
2.5-3 lbs short ribs - elk, buffalo or beef should all work fine
1 Tbsp. cooking oil
4 cups soaked Navy beans (approx 2 cups dry, soaked over night if possible)
2 small or 1 large onion, diced
3 -4 cloves of garlic, chopped
2-4 pieces of sliced bacon, chopped into 1 inch pieces
2 Tbsp. deli mustard
1/3 cup honey, brown sugar or molasses
1/3 cup Worcestershire sauce
1 cup fruit preserves, jam, puree or marmalade
2 cups tomato juice, or approx. 1 cup thick tomato sauce and 1 cup water
3 cups water
1 1/2 tsp. salt
You'll need a large, heavy skillet or pot to brown the ribs in. You'll also need a large crockpot for slow cooking or a large covered casserole for baking this dish in the oven.
Here are the main ingredients...starting clockwise from "high noon" we have a half-pint jar of Sunshine Marmalade, a quart jar of home-canned tomato juice, two small onions and a small head of garlic, a tub with some home-cured bacon made from local pork belly, a 2.5 lb package of elk short ribs, and a four-cup measuring cup with soaked navy beans.

First, rinse the short ribs, pat them dry, and brown them in 1 Tbsp. oil in a large, heavy skillet. Get them good and brown and even a little crispy around the edges. This adds flavor and also helps cook out a bit of the extra grease. Don't worry, there's still plenty of flavor left. And don't forget that you're going to add some chopped bacon to the dish as well, so a little less grease here is a good thing.

To keep yourself occupied while the ribs are browning, you can start dicing up the onion, garlic and bacon. Don't worry too much about dicing the garlic super fine - chunky is good enough - you just don't want to spoon up some beans and get a whole clove of garlic in that one bite. Well, maybe you do. But, I really don't - I'd rather spread all that yummy garlic around a bit.

Pour the soaked beans into the bottom of the pot. Sure, they'll float around after you add all the liquids, but I like starting them off in a neat pile in the bottom of the crockpot anyway.

Toss the diced onions, garlic and bacon in on top of the beans. Mmmmmm! In case you were wondering, so far everything in the pot is local. It's already starting to smell good - and we don't have everything in it yet!

Measure out the mustard, and put that in, too. This is some home-made mustard I put together a week or so ago. It's yellow mustard flour and some whole brown mustard seeds, with some vinegar, water and a bit of salt. You can use whatever mustard you like best, or whatever you have in your fridge. I bought the makings from Penzey's, so this isn't really local. Maybe that will change some day - I know mustard should grow well here.

Measure out the honey, and put that in. You could add more honey if you like, but I didn't want the beans to be overly sweet. Just a tiny bit of sweet with the savory onion and the tangy tomato is what I'm after here.

See! Local honey! Believe it or not, I got it at Sam's. What you can't see in this picture is that the honey was so thick I had to literally squeeeeeeze it out of the jug like toothpaste. It had been sitting in our storage room. I guess it is a little cool in there right now.

Pour 1/3 cup of Worcestershire sauce in over it all. You could probably use soy sauce if you don't have any Worcestershire, but I think you'll be missing some of the flavor. Nope, Worcestershire isn't local. But it's good stuff!

Pour or spoon 8 ounces of your favorite fruit jam, marmalade or puree into the pot. I'm using something I call Sunshine Marmalade. It's an apricot jam that's been pepped up with some citrus zest and finely diced fresh ginger. We like it much better than plain apricot jam, which often seems to taste a bit bland to me. This was made from some really lovely home-grown apricots our next door neighbors gave us last year.

By now the ribs should be good and browned on both sides (you did remember to flip them every few minutes, didn't you?) Drain the browned ribs a bit, and plop them right on top of all the other stuff you just put in the crock. Sprinkle the salt in now.

Pour the tomato juice and water over everything, and plug the crockpot in and cook for 10-12 hours on low, or put it all into a large covered dish in the oven at 300-325 degrees for about 4-5 hours. You want it to cook nice and slow so the beans can soak up all that good flavor floating around and the ribs can become falling-off-the-bone tender. Keep an eye on the liquid levels so the beans don't dry out.

Here's the final product! The rib meat was falling off the bones, and the beans came out savory and just a little sweet. I added a bit of Tabasco Chipotle sauce towards the end - just a few shakes - and I think it made the beans a lot more flavorful. I think one change I'll make next time is to marinade the elk ribs overnight - they were good and tender and tasty, but not quite as flavorful as I'd like. I think a nice garlicky wine marinade, with perhaps a bit of mustard added, would be just the ticket.

Subscribe to:
Posts (Atom)