Showing posts with label dairy. Show all posts

Sunday, February 17, 2008

Cambozola: Day 23 - First Taste - Dark Days Challenge

When I went to the storeroom yesterday to check on the cheeses, I noticed the Cambozola clone seemed to be pretty well ripened and was giving off a really delicious cheesy smell.


So we decided to try it, even though it really probably needed another couple of weeks to age. Here's what it looked like cut open.


The taste - how to describe it? It's a very interesting mixture of creamy and sharp. It's very close to Cambozola in taste, although as you can see, there is no blue mold in sight. We think the lack of air holes kept the blue mold from growing to maturity within the cheese, although it doesn't seem to have kept it from growing enough to provide some flavor. The outer edge is creamy and runny like Camembert, the inner is creamy and a little sharpish like a good dolce Gorgonzola. It was wonderful on hot bread fresh from the oven, and consensus is that even if it's not exactly a Cambozola clone, it's pretty darned good!

Thursday, February 7, 2008

Cambozola: Day 13 - Piercing and Wrapping - Dark Days Challenge

Well, as you can see, the fuzz on the (hopefully) Cambozola cheese clone has totally taken over the outside of the cheeses and is covering them to a depth of about 1/8 inch or so.

This means it's time to wrap the little boogers in cheese wrap and then wait with baited breath for another couple of weeks to see how they turned out. But, because I just can't ever seem to leave well enough alone, I tried an experiment. The blue cheese recipes I've read generally tell you to pierce the cheese all over with a thick needle or ice pick to let the bleu mold "breathe" before it goes into aging mode. So I pierced one Cambozola clone cheese, and left the other unpierced. If the piercing is successful in helping the blue mold grow, then I should begin to see blue mold poking out of the holes I made in the side of the little cheese wheel in a week or so.


The good thing about piercing the one cheese is some of the inside oozed out over the needle while I was working. That means I got to try a tiny taste of what is going on with the cheese under all that fuzz - and it was already really creamy and tasty! So I can hardly wait to see how this all turns out. I wonder if making the cheeses small like this hastens their ripening - the larger surface area for the mold compared to the inside area may be having that effect. If so, I may actually be able to try these in about one month or so from start to finish, vs the two months suggested for ripening a larger size.

I'm going to start another batch of Cambozola clone this weekend, plus another cheddar or a gouda. This cheesemaking could get to be addictive!

Saturday, February 2, 2008

Cambozola: Day 7 - We have fuzz!!! - Dark Days Challenge

When I opened up the cheese aging box this morning to check on the progress of the Cambozola I started last weekend, I caught a lovely whiff of "mushroom" - and if you look closely, within the red circle, along the edge of the cheese, you can see the beginnings of penicillin candidum fuzz! Looks like even if the "-ozola" part doesn't work out, the "camb" part should be fine. That's a relief, because it means I've probably managed, through sheer dumb beginner's luck, to avoid the worst of the mistakes I could have made with this cheese to this point. As long as I keep it in the proper temp and humidity range, I should end up with something at least edible - whether it's gonna be the Cambozola clone I was aiming for remains to be seen...

While we're on the subject of "fancy shmancy food" - I have something in the works for the Dark Days Challenge that may turn out to be very, very cool. It's still in the planning and research stages, but at this point I think I've learned enough and located all the raw local materials I need to succeed. However, there's always the chance the project will still fall through for some reason outside of my control, so I'll keep mum on what it is for now. But if it doesn't fall through, look for news on something very unexpected on the local Idaho foods front next weekend!

Friday, February 1, 2008

Making your own dairy products: Kefir

Culturing your own Kefir

Kefir, also called the "champaign" of dairy drinks, is cultured using both a yeast and a lactic bacteria group like that used for making yogurt. Because of the symbiotic yeasts, Kefir can be a little fizzy but it mostly just tastes a lot like yogurt to me. I like Kefir because it cultures at room temperatures and it has a wide range of tolerance for culturing times (mine cultures in about 8-12 hours, but is still sweet and drinkable after as long as 24-36 hours.) Kefir can be used as-is for super quick morning "smoothies" and it also makes a good substitute for buttermilk in salad dressings and recipes. Like yogurt, you can also drain the whey from the Kefir solids and make a sort of spreadable "cream" cheese from it. I make a half gallon of Kefir pretty much every week, which gives me five 8 ounce servings for quick school day breakfasts on the go, one larger amount to use as buttermilk substitute for salad dressings or recipes during the week, and about half a cup or so to set back to use for culturing the next batch.

Yogourmet Kefir Culture is the culture I'm using right now. I got a good deal on several packages a few months ago and plan to continue using it until it's used up - but I plan to buy Kefir "grains," probably from these folks, after that for a more sustainable Kefir solution. I've heard the biotics of grain Kefir are better for you and the Kefir itself is a lot tastier, but I don't know that for sure as I've not tried them yet.

When I make Kefir, I follow this very basic procedure: Pour one quart of refrigerator temperature milk into a very clean two-quart pitcher, and heat the other quart up in a microwave safe cup for about 2 minutes on high. This should make the milk very warm, but not warm enough to form a "skin" or to boil over. I then combine the warm and cold milk in the pitcher and stir it well. The reason I do this is to bring the temperature of the cold milk up enough to culture the Kefir without having to let it sit all day on the counter, growing things other than Kefir as it very slowly warms up...

Once the milk is about 70 - 75 degrees, I either open a packet of culture and stir it in, or dump in the half cup or so of last week's culture that I saved from my last batch and stir that in. I've found I can re-culture my Kefir at least 5 or 6 times before it starts to change texture and become more sour than I like it. (This is why it will probably take me a year to go through all the packets I bought a few months ago!) After innoculation, I cover the milk and culture mix with a lid or a clean kitchen towel, and set it back on the counter out of the way.

After about 8 hours or so I begin to check the Kefir to see if it has thickened up. Once it has thickened up to my satisfaction, I give it a good stir to break it up a bit, and pour it into my single serving size bottles, reserving another half cup for next week's culture. I put my new batch of Kefir into the fridge, clean up the pitcher, and I'm all set for a week's worth of smoothies. Actual hands on time once you have made a few batches and know what you're doing will probably be less than 10 minutes a week.

Monday, January 28, 2008

Cambozola: Day 2

How to make cambozola is apparently a bit of a trade secret, so while I did a fair bit of online research on the steps, all I was able to find were other home cheesemakers like myself trying to figure it out! So it will be interesting to see if this works or not. Even if it doesn't, I should still end up with an interesting cheese. (Btw, the dark stuff on the insides of my "high-tech empty #2.5 can cheese molds" is not rust, it's condensation and whey droplets.)

The curds basically have to drain for a couple of days under their own weight. This is Day 2 - I packed the curds into the molds yesterday (they were all the way to the top of the molds to start with) and they have been draining whey ever since. Way much more whey than I would have thought that little bit of curds could hold! Seems like cups and cups. Anyway, the curds have shrunken down to about 1/3 of their original height, and it is all starting to hold together when I turn the "mold sandwiches" every few hours. Later tonight, I'll test them to see if they are solid enough to go without being in the molds, and start gently sprinkling salt on the outside. Then I'll put everything into the "portable cheese cave" I've made from a clear plastic shoebox and a plastic shelf, schlep it down to the 45 degree storage room, and wait the next several days to make sure it starts growing the white fuzz it's supposed to grow. Crossing my fingers!

Sunday, January 27, 2008

It's a Dairy Day

Maybe it's all the white stuff flying around here today, or maybe it's because my son graciously stopped by Reed's Dairy Store on his way back from teaching lab at the ISU campus late last week and bought me some more of their lovely milk and cream, but today just seemed like a Dairy Day to me.

I already make Kefir nearly every week - I like it because it's got all the goodness of yogurt in a more drinkable form. The aforementioned son was on a Starbuck's "Latte in a Bottle" kick late last year, and I cheerfully confiscated all his empties, washed them and reused them. He thinks I'm nuts, but the bottles were good reuseable glass with sturdy metal lids, so what's not to like? I make my kefir for the week, pour it into these lovely little recycled bottles and I have breakfasts to go all week long for my busy schedule. Pop a little fruit puree into a bottle (Hmmm, huckleberry today? or raspberry? or apricot-ginger? maybe sour cherry? Decisions, decisions!) and I've got a nutritious light breakfast that I can take with me whereever I like, for about 20 cents per serving. And I control all the ingredients, including how much sugar, if any, goes into it.

Today, while I had everything out anyway, I decided to make a batch of yogurt and a batch of sour cream as well. The whole process took about 15 minutes. Well, and a few hours to set up, but I don't have to do anything with it during that time. I made my usual half gallon of Kefir, plus a quart each of yogurt and sour cream. More than enough to last a week for us. The sour cream might even last two, unless I decide to make Elk Stroganoff or something else sour-cream-intensive later this week.

It's moderately lucrative to make your own at home, and doing things like this is how I can afford to pay a little bit more for local stuff now and then and still not bust our family food budget. For instance, the cost to make all these dairy products, besides the 15 minutes of hands on time, was approximately $6.50. The cost for these items, if bought in a store on sale, would be about $10.50. It actually would likely be more, because I have never really seen kefir for sale here in the usual venues - so when I added up the costs, I just counted it the same as an equivalent amount of yogurt. In actuality, if it were available, it would probably be more expensive. So paying a little more for our milk in light of that doesn't cause me undue concern. Especially since it's better for us. And it just tastes better, too, which is definitely worth the few extra cents!

Mmmmmmm, Elk Stroganoff. Dang, I wish now I hadn't promised myself I'd do a meatless meal for my next Dark Day Challenge meal. Oh, well, it'll keep!

Saturday, January 26, 2008

What's going on in the kitchen this weekend?

Homebrewing: I have two fruit wines and a simple sweet mead that need to be bottled. I have another bottle of concord grape wine in the storage room that may also be ready to bottle, but if I can get the three I have upstairs racked and into the little single serving size bottles I bought, then I'll be doing well! (Update: the plum wine apparently isn't ready to bottle yet, once I brought it up into the warmer house, it began to bubble again! So, I guess that one will wait for another couple or three weeks. The mead and raspberry wines are bottled, though, and I even "prettied up" a few bottles for a picture!)

Salad Table: I will have transplanted nearly all the salad starts by the end of this weekend. They are actually doing pretty well! The lettuce is about three inches or more tall. The shallots are sprouting like mad and should be ready to start cutting by next week some time. With luck, the lettuce will be ready for a first light picking in a couple of weeks. Maybe I can serve my sweetie a home grown salad for Valentine's Day. Keeping my fingers crossed...

Cheesemaking: I decided to go for broke and make a batch of Cambozola. It's a Gorgonzola/Camembert hybrid that we just love melted on fresh, hot bread. Since we have fresh hot bread nearly every day now, I figured I'd give that a try. It's also a cheese we can rarely find here in the grocery stores, and when we can find it, it's generally 12-14 dollars a pound. So economically, it's a very good candidate for home cheesemaking. If it works, I should be able to make a little over a pound of it for just a bit more than the cost of a gallon of milk.

Dark Days Challenge: I am still trying to settle on my DDC meal to document for this week. I'm leaning towards oriental food (something we eat a lot of and love) but I can't decide between chicken or pork based dishes. We have both local pork and chicken in the freezer right now, so I could do either. My sweetie is nursing a cold this weekend, though - so I think chicken would be a good idea. I can make him bunches of chicken soup (the roasting chicken we got from a local source here is about an 8 pounder, dressed, so there's plenty for several meals on that one!) and still have lots of meat left to make other dishes.

At any rate, I'll have pictures for all of this up at intervals over the weekend. I have some step by step on the Chicken Udon Soup I made tonight, but it's been a long day with the mead and wine bottling and nursing a sick husband, so it may have to wait till tomorrow!

Monday, January 21, 2008

Farmhouse Cheddar Cheese Update

Well, we opened it tonight, and about a third of the two pound wheel is already gone. I think that means it passed muster with the crew, so I'll be making some more in the next couple of days. Hooray for us, we actually made some pretty decent hard cheese!

The color was an almost startlingly bright white, the flavor was a nice semi-sharp with perhaps a little too much acid but not seriously out of character, and the texture was somewhat dry and flaky. (The book mentioned it would be dry-ish and flakey - that was fine by me.) We chose this cheese for our first hard cheese because it's ready in only 4 weeks, as opposed to at least three months for most of the other hard cheese recipes. I used the recipe for Farmhouse Cheddar in the cheese book listed at the bottom of the blog - so far it's been a winner! We're going to make another one or two cheddars in the next couple of weeks, plus a couple of camemberts and a couple of small bleus. I will probably need to make something pretty much every week in order to build up our "cheese cellar" to the point that we can have enough to use more often than once a month. I think it will be fun, though!

Here is a picture of the freshly opened cheese:

Sunday, January 13, 2008

Recipe: Huckleberry Pots de Creme - Dark Days Challenge

HUCKLEBERRY AND VANILLA BEAN POTS DE CREME
serves 4 - 5

4 egg yolks (use 5 if any of the eggs are small)
3/4 cup whipping cream or heavy cream
3/4 cup half-and-half (make your own if necessary)
1/4 cup sugar (white or turbinado)
1/2 of a 5-6" vanilla bean, split
pinch of salt
6 Tbsp. sweetened Huckleberry jam, preserves or puree
4 - 5 four ounce ceramic ramekins or other oven safe small bowls or cups

Preheat your oven to 350 degrees.

You will also need small squares of aluminum foil to cover the tops of the ramekins, a deep oven safe casserole or other pot that all the ramekins can fit into, a four cup bowl or oversized pyrex measuring cup, and a one cup microwave safe bowl or cup. Oh, and a wire whisk or an electric hand blender with a whisking attachment.

Here are the ingredients: clockwise from high noon we have whole milk, farm-fresh eggs, Huckleberry puree, heavy whipping cream, white sugar, vanilla beans, as well as four small ceramic ramekins and a larger ceramic casserole. All of the ingredients except for the vanilla beans are local. Well, the huckleberries came from Northern Idaho, but we picked them ourselves while on summer vacation, so I think that counts!


Split the vanilla bean lengthwise, and use the edge of your knife to scrape out all the tiny, glistening black vanilla specks. Put your half-and-half into a one cup microwave oven safe cup, add the sugar, the pinch of salt, and stir the vanilla specks into it. Heat the half and half in a pyrex measuring cup in the microwave on high for about one minute, or until steamy hot but not boiling over. You can also use a small pot on the stove, but be sure to watch it and stir it constantly.


In your 1 quart bowl or oversized pyrex cup, beat the egg yolks until they are thick. Pour the hot half-and-half slowly into the egg yolks, beating them as you go with a whisk. Whisk in the rest of the heavy cream. Note: if you use a hand blender, beat the mixture on low to medium, not on high, or you may end up with egg yolk spattered on everything in sight.

(Not that I would know, of course. Because you do NOT see egg yolk spatters on everything in sight in the background of this picture. It is just your imagination.)


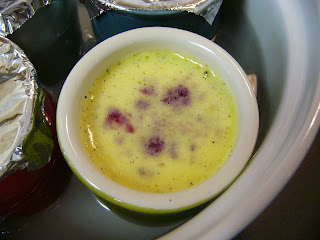
Pour the still-warm mixture into four or five 4 oz. ramekins, trying to avoid pouring in any of the foam from the whisking process. This is where mixing the custard in a large Pyrex cup comes in handy - the spout helps keep the foam back while you pour. If you have to, you can skim the foam off with a spoon, however.


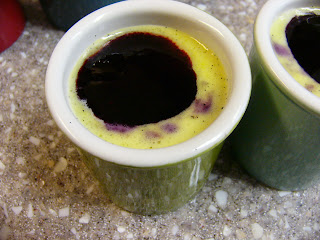
Here is the fun part - drizzle one teaspoon of Huckleberry puree into each cup of custard. Yum, yum, looks good already, doesn't it? Yes, there will be some Huckleberry puree left. No, you may not eat it. Save it for spooning over the tops of the finished custards. Yes, I know I'm a meanie, but you'll thank me later.


Cover each pot de creme with a small square of aluminum foil. Put the smaller pots into your larger pot and fill the larger pot with enough hot water that it comes about halfway up the sides of the ramekins. Now, put the whole thing into your oven for about 30 minutes.


The pots de creme are done when the edges are set but the middle still wiggles. Remove them from the oven, and let them cool enough to handle. Take them out of the larger pot, and allow them to sit on the counter, covered until they are near room temperature. Put them, still covered, into the fridge for 4-6 hours or overnight. That's it!


Serve cold with another dollop of Huckleberry puree. You can also double your caloric trouble if you like by whipping up a bit of the leftover heavy cream and dotting each pot with that as well.